DIY Li-ion/Li-po/18650 Charger
Build your own DIY Li-ion battery charger and protection circuit
Introduction
Li-ion batteries are the most common in home electronics. They are one of the most popular types of rechargeable batteries for portable electronics, with a high energy density, tiny memory effect, and low self-discharge.In this post, we will make Li-ion charger and protection circuit using TP4056 Module, which costs around 1USD.
Components Required-
- TP4056 Module ( Get it now AliExpress / Amazon)
- Li-ion battery ( Amazon )
- 5V supply or a Micro USB connector.
- Connection wires
Working-
The TP4056 is a complete constant-current/constant-voltage linear charger for a single cell lithium-ion battery. It can also work within USB and wall adaptor as it has a Micro USB input port.It has an internal PMOSFET architecture which acts as a blocking diode, the thermal feedback regulates the charge current to maintain the temperature of the module during high power operation.
The charging voltage is fixed at 4.2V and the TP4056 automatically terminates the charge cycle when the charge current drops to 1/10th of the programmed value after the final float voltage is reached.
The module has 2 inbuilt LEDs that indicates the charging status of the cell.
Red LED is ON during charging and once the charging is completed the blue LED is turned ON.
Connection/Circuit schematics
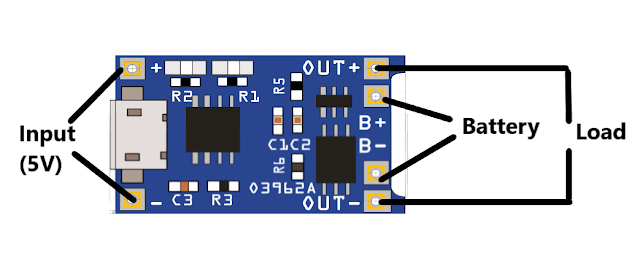
TP4056 has 2 input pins on the very left side of the above-given image, an input of 5v can be applied to the module via these pins or using the micro USB port.
The battery must be connected to the B+ and B- pins.
The load is connected to the OUT+ and OUT- in order to prevent short circuit and over discharge of the battery.
Now just add the battery to the module as shown and your Li-ion cell charger is ready.
Buy your TP4056 Module here - Click here
Check these out-
Portable DIY Li-ion Powerbank Click here.
DIY Powerbank from a 9V Battery Click here.


No comments